

I am currently working on a Getting Started course for HashiCorp’s Vault product. There was a pretty cool demo I put together for using Azure AD as an authentication source for Vault, but unfortunately I had to cut it for sake of time. I didn’t want it to go to waste though; so I figured I’d write about it here instead. Here’s what we’re going to do. Use the Managed Service Identity feature in Azure to give an Azure VM permissions to access secrets in Vault. This is the sort of thing that could be applied to anything that can receive an MSI in Azure, including App Service, Functions, VMSS, and more!
Now I am not going to get into what HashiCorp Vault is or why you might use it over Azure Key Vault or AWS KMS. There are def reasons, but I don’t want to get into those reasons right now. Instead let’s dive right into the tech. First you are going to need to have Vault installed on your local machine. Just follow this link, and get the executable. You are also going to need an Azure subscription, because of course you are silly. In order to get Vault talking to Azure, we are going to need to know a few things. The Subscription ID your are going to spin resources up in, and the Tenant ID where the MSI will be created. That’s pretty easy to come by. From the Azure Portal, spin up the Cloud Shell in Bash mode and enter the following:
az account list
You’ll get output that looks roughly like this:
{
  "cloudName": "AzureCloud",
  "id": "XXXXX-XXXX-XXXXX-XXXXX-XXXXX",
  "isDefault": true,
  "name": "MAS",
  "state": "Enabled",
  "tenantId": "XXXXX-XXXX-XXXXX-XXXXX-XXXXX",
  "user": {
    "cloudShellID": true,
    "name": "live.com#ned.bellavance@gmail.com",
    "type": "user"
  }
}
The id field is your Subscription ID and the tenantID, well… I think you can figure that one out on your own. If you have multiple subscriptions, you’re going to want to have the proper one selected. Go ahead and run:
az account set -s [SubscriptionName]
The next thing we need to do is create an account for Vault to use when attempting to access Azure AD. That account is called a Service Principal. And since we’re already in Cloud Shell, we might as well do that here.
az ad sp create-for-rbac --name http://vaultsp --role reader --scopes /subscriptions/AZURE_SUBSCRIPTION_ID
You will get something along these lines:
{
  "appId": "d2b5e840-5554-4a35-8e21-b9a189e6c5ff",
  "displayName": "vaultsp",
  "name": "http://vaultsp",
  "password": "328da32c-d16e-4680-9f5e-9955dd85ddaf",
  "tenant": "XXXXX-XXXX-XXXXX-XXXXX-XXXXX"
}
Don’t worry, I’ve already deleted the account since this post went live. In order to configure Vault, we will need the appId and password values. Now let’s get to configuring Vault!
First we are going to start up an dev instance of the Vault server. This instance needs to be running either from a publicly accessible endpoint, or in a Vnet that an Azure VM can talk to. Once the Azure VM is authenticated by Azure AD, it is going to want to talk to the Vault server. I recommend spinning up an Ubuntu 18.04 instance for this in Azure. As long as the new Azure VMs will be running in the same Vnet, you won’t need to open any additional ports. Once you are logged in using SSH, you’ll need to install Vault. The easier way is to run the following:
#Install unzip
sudo apt update
sudo apt install unzip -y

#Set the version of Vault to download
VAULT_VERSION="1.0.1"
wget https://releases.hashicorp.com/vault/${VAULT_VERSION}/vault_${VAULT_VERSION}_linux_amd64.zip
unzip vault_${VAULT_VERSION}_linux_amd64.zip
sudo chown root:root vault
sudo mv vault /usr/local/bin/
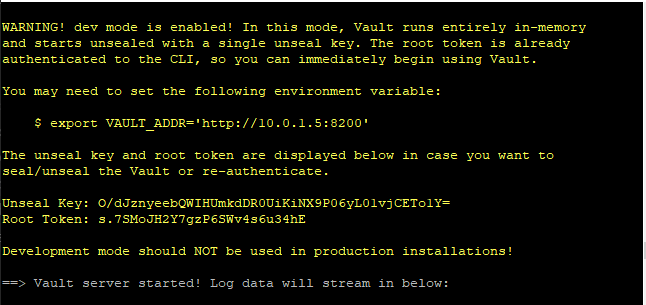
Now that we have Vault installed and ready to go, we can get an instance of that Dev server running. By default the dev instance is configured to run on the loopback adapter, which doesn’t work so well for external resources. So we’re going to need the IP address of the VM running Vault. Once you have that, go ahead and run:
vault server -dev -dev-listen-address=X.X.X.X:8200
Replacing X.X.X.X with your IP address. You’ll get a running instance of Vault, along with the root token. You should grab that info to login.
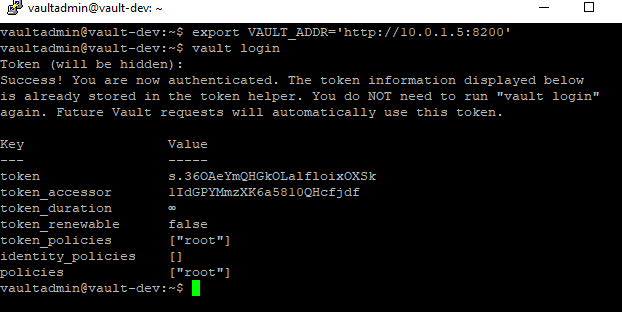
Now start a separate terminal session and run:
export VAULT_ADDR='http://X.X.X.X:8200'
vault login
Paste in the root token and you are now logged into Vault!
Now let’s enable the Azure authentication method in Vault:
vault auth enable azure
Once we’ve enabled it, then we need to configure it.
vault write auth/azure/config \
    tenant_id=AZURE_TENANT_ID \
    resource=https://management.azure.com/ \
    client_id=AZURE_CLIENT_ID \
    client_secret=AZURE_CLIENT_SECRET
Go ahead and plug in the information you gathered earlier. Now in order for an identity in Azure to get access to resources in Vault, we need to create a role in the Azure auth method. The role will be composed of policies within Vault that will be assigned to the role, and then a number of other properties. Some of the properties are prefixed with bound, and they serve to restrict which resources in Azure can request a token using this role. For instance, if you wanted to restrict the role to a specific location and resource group, you could use the bound_resource_groups and bound_location properties. The full doc is here if you are curious about other properties that can be used. Here’s what I used for this example:
vault write auth/azure/role/web-role \
    policies="web" \
    bound_subscription_ids=AZURE_SUBSCRIPTION_ID \
    bound_resource_groups=vault
This command assumes that we have a policy named web and a resource group named vault. Go ahead and change the resource group to one that makes sense for you. Now we need to create the web policy. In order to create the policy, we are going to need a policy file formatted in either HashiCorp Configuration Language (HCL) or JSON. And since only a masochist would choose JSON, let’s try HCL instead:
path "webkv/*" {
  capabilities = ["read", "list"]
}
Take that text and save it as webpol.hcl. In a nutshell, we are granting the policy holder read and list rights to the path “webkv”. Of course the path “webkv” doesn’t yet exist, so let’s go ahead and create it:
vault secrets enable -path=webkv kv
vault kv put webkv/webpass password=marvin
And I dropped a secret in there for good measure. Now we can create the policy:
vault policy write web webpol.hcl
That’s it on the Vault side. We’ve configured the Azure AD connection. We’ve created a role for an authenticated resource to assume. We’ve created a policy for that role, and created an instance of the key value store to hold secrets. Now we need to test this all out. That will be in the next post.
May 23, 2026

May 4, 2026


